A Beginner's Guide to Data Engineering: Building an ETL Pipeline in AWS with Redshift

I am a computer engineering undergraduate highly interested in Data engineering, Artificial intelligence, Machine Learning and Natural language processing. I like exploring and learning new technologies and I will be writing various blogs here during my learning journey
Introduction
Hello There 👋🏻. Hope you all are doing well. In this blog, I will elucidate a recent data engineering project I undertook, leveraging the prowess of AWS services. Throughout this endeavor, I harnessed the capabilities of AWS S3, Python, and Redshift to construct a seamless end-to-end ETL pipeline, ultimately storing the processed data in a data warehouse. My primary objective behind crafting this blog is to acquaint you with the fundamentals of ETL pipelines and data warehouses, which serve as fundamental pillars for numerous data engineering projects. I sincerely hope you find this read both enlightening and enjoyable.
What is ETL?
ETL, an acronym for Extract, Transform, and Load, is a pivotal process in data management. It serves the purpose of collecting data from diverse sources, transforming it into a usable format, and ultimately loading it into a destination for analysis and informed decision-making. The "Extract" step involves gathering data from databases, spreadsheets, APIs, or web scraping. Subsequently, in the "Transform" step, the data undergoes cleaning, organization, and processing to enhance its usability. Finally, the cleansed and standardized data finds its place in data stores such as data warehouses or databases, ready for analysis and reporting.
Data engineers are the architects of this ETL process, crafting ETL pipelines to achieve seamless data flow in AWS, utilizing services like AWS Glue and AWS Redshift. Once the data is collected and processed, it becomes a valuable resource for data analysts and data scientists, driving significant business decision-making.
What is an ETL pipeline?
An ETL (Extract, Transform, Load) pipeline serves as a vital data integration process that streamlines the ETL workflow. Its mission is to efficiently extract data from diverse sources, transform it into a consistent and usable format, and then load it into a destination storage system. This seamless data flow empowers businesses with the ability to leverage the data for critical insights, business intelligence, analysis, and decision-making.
For better comprehension, let's consider an analogy with a typical water pipeline system. In this scenario, the pipeline acts as a conduit to deliver water from various sources like rivers, lakes, and wells to a central reservoir, serving households and industries. Similarly, in the ETL pipeline, the water sources represent raw data sources, and the water they hold symbolizes raw data. In the "Extract" step, pumps gather water (data) from these sources. To make the water suitable for consumption, the "Transform" step purifies and treats it, removing impurities. Ultimately, the treated water is loaded into the central reservoir (data warehouse or database) for organized distribution. This distribution resembles the final "Load" step, where analytical tools supply the data to various users like business analysts, supporting their distinct needs and requirements.
ETL pipeline implementation using AWS Services
I will now be explaining an ETL pipeline project that I have implemented using various AWS services like S3 and Redshift. In this project, I have created a simple ETL pipeline that extracts the data from 2 CSV files, transforms the extracted data to create fact and dimension tables and finally loads the transformed data to the data warehouse.
About Dataset
In this project, I have used Sephora Products and Skincare Reviews dataset which I took from Kaggle. This dataset contains descriptions of various skincare products and also reviews of these products by various customers. The dataset is available at this link Sephora Products and Skincare Reviews | Kaggle
Data Model
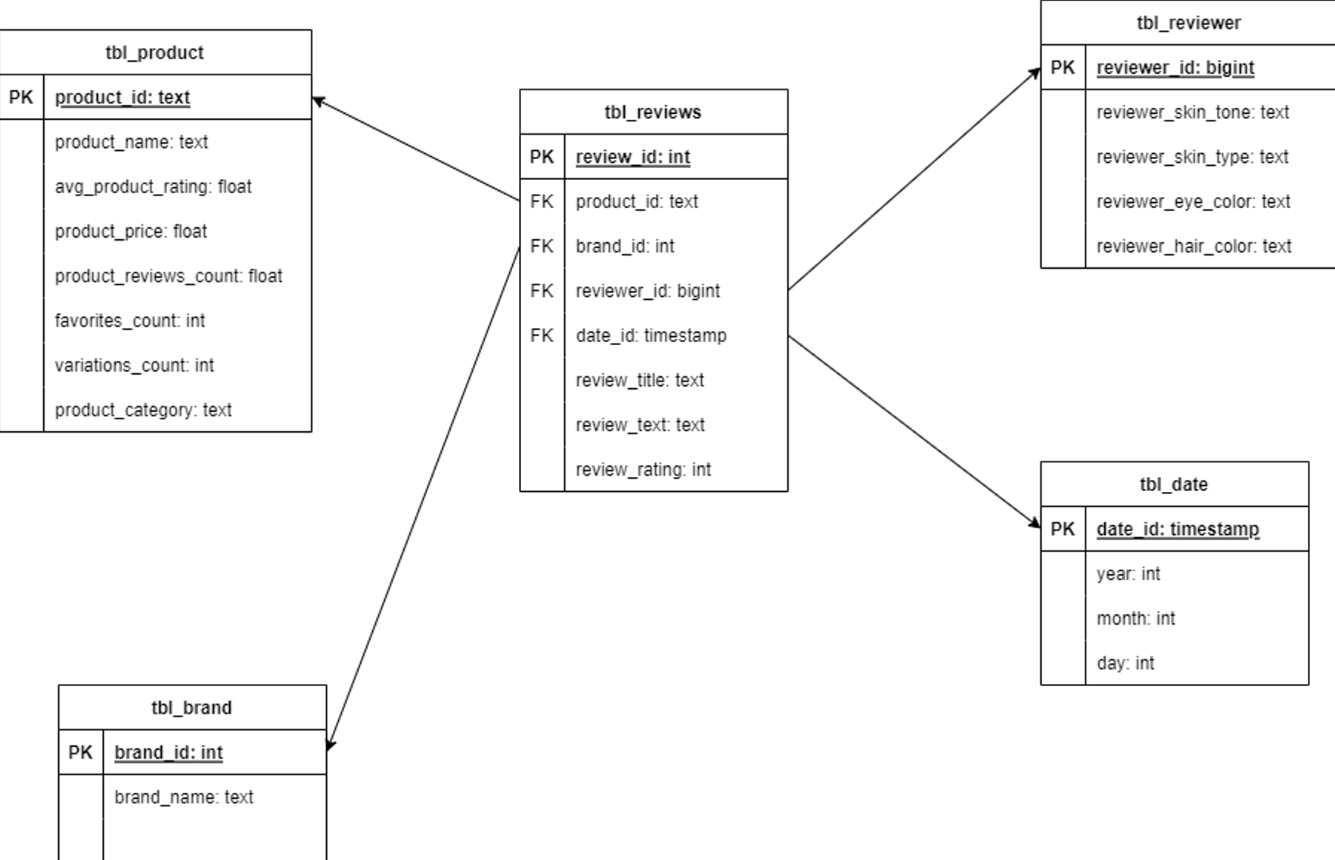
Originally, data is present in the form of CSV files. After the ETL process, the final data will be stored in the data warehouse following the data model shown below. I have used a star schema for data modeling where tbl_reviews is a single fact table and tbl_product, tbl_reviewer, tbl_brand and tbl_date are the dimension tables.
ETL Workflow
To implement ETL workflow, I have used boto3 to connect to AWS and provisioned all the required AWS resources using boto3 from a Jupyter Notebook. Also, I have created functions for implementing extract, transform and load steps in the same Jupyter notebook. The following steps are performed inside the Jupyter Notebook to implement the ETL pipeline.
Importing Necessary Libraries and Configuring the AWS Account
The following are the essential libraries used in this project.
 # To connect to AWS
 import boto3
 # To parse the data in config file
 import configparser
 # to process data
 import pandas as pd
 # using json
 import json
 # to connect to Redshift cluster
 import psycopg2
I have created a configuration file called dwh.cfg where I have stored all the necessary configurations for connecting to my AWS account. These configurations include AWS Secret keys, usernames, passwords and various other configurations necessary for provisioning AWS resources. The following code is used to read the configuration from the configuration file.
 # Initialize the configparser object
 config = configparser.ConfigParser()
 # read the configuration from local file
 config.read_file(open('dwh.cfg'))
 # Load the parameters from the config file into variables
 KEY                    = config.get('AWS','KEY')
 SECRET                 = config.get('AWS','SECRET')
 AWS_REGION             = config.get("AWS","DEFAULT_REGION")

 DWH_CLUSTER_TYPE       = config.get("DWH","DWH_CLUSTER_TYPE")
 DWH_NUM_NODES          = config.get("DWH","DWH_NUM_NODES")
 DWH_NODE_TYPE          = config.get("DWH","DWH_NODE_TYPE")

 DWH_CLUSTER_IDENTIFIER = config.get("DWH","DWH_CLUSTER_IDENTIFIER")
 DWH_DB                 = config.get("DWH","DWH_DB")
 DWH_DB_USER            = config.get("DWH","DWH_DB_USER")
 DWH_DB_PASSWORD        = config.get("DWH","DWH_DB_PASSWORD")
 DWH_PORT               = config.get("DWH","DWH_PORT")

 DWH_IAM_ROLE_NAME      = config.get("DWH", "DWH_IAM_ROLE_NAME")
The next step is to create various boto3 clients to access various AWS services and to provision resources. I have used the following code to create boto3 clients for services like ec2, s3, iam, glue, Athena and redshift.
 try:
     # ec2 is needed for creating and configuring security group for redshift
     ec2 = boto3.client('ec2',
                         region_name=AWS_REGION,
                         aws_access_key_id=KEY,
                         aws_secret_access_key=SECRET)

     s3 = boto3.client('s3',
                         region_name=AWS_REGION,
                         aws_access_key_id=KEY,
                         aws_secret_access_key=SECRET)

     iam = boto3.client('iam',
                         region_name=AWS_REGION,
                         aws_access_key_id=KEY,
                         aws_secret_access_key=SECRET)

     glue = boto3.client('glue',
                         region_name=AWS_REGION,
                         aws_access_key_id=KEY,
                         aws_secret_access_key=SECRET)

     athena = boto3.client('athena',
                     region_name=AWS_REGION,
                     aws_access_key_id=KEY,
                     aws_secret_access_key=SECRET)

     redshift = boto3.client('redshift',
                             region_name=AWS_REGION,
                             aws_access_key_id=KEY,
                             aws_secret_access_key=SECRET)

     print("Boto3 clients created succesfully")
 except Exception as e:
     print("Folowing error was encountered:\n{e}")
Extract Step
The extract step of the ETL pipeline begins with downloading the CSV files from the Kaggle dataset. This was done manually. The CSV files were then converted to parquet format and the parquet files were then loaded to an S3 bucket in AWS. Parquet format is chosen as it stores data in optimized columnar format and uses a compression algorithm that can reduce storage costs and also improves query performance.
I used the pandas library in Python to convert the CSV files to Parquet format as shown in the code below:
 # Read the csv dataset
 # Dataset Folder
 DATASET_FOLDER = 'datasets'

 df1 = pd.read_csv(f"{DATASET_FOLDER}/product_info.csv")
 # low_memory=False to deal with mixed datatypes warning
 df2 = pd.read_csv(f"{DATASET_FOLDER}/product_reviews.csv",index_col=0,low_memory=False)

 # Transform to parquet format
 df1_t = df1.to_parquet(f"{DATASET_FOLDER}/product_info.parquet")
 df2_t = df2.to_parquet(f"{DATASET_FOLDER}/product_reviews.parquet")
 print("Data succesfully converted to parquet format")
In the next step, I used the S3 boto3 client to create a new S3 bucket and then upload these parquet files to the S3 bucket. While creating an S3 bucket, the bucket name should be globally unique, and we need to check if the bucket already exists or not in our AWS account. After creating the S3 bucket, all the parquet files for the raw data were uploaded to the same S3 bucket. The following Python code was used to create a new S3 bucket if the bucket doesn’t exist and to upload the raw data to the same S3 bucket if the bucket already exists.
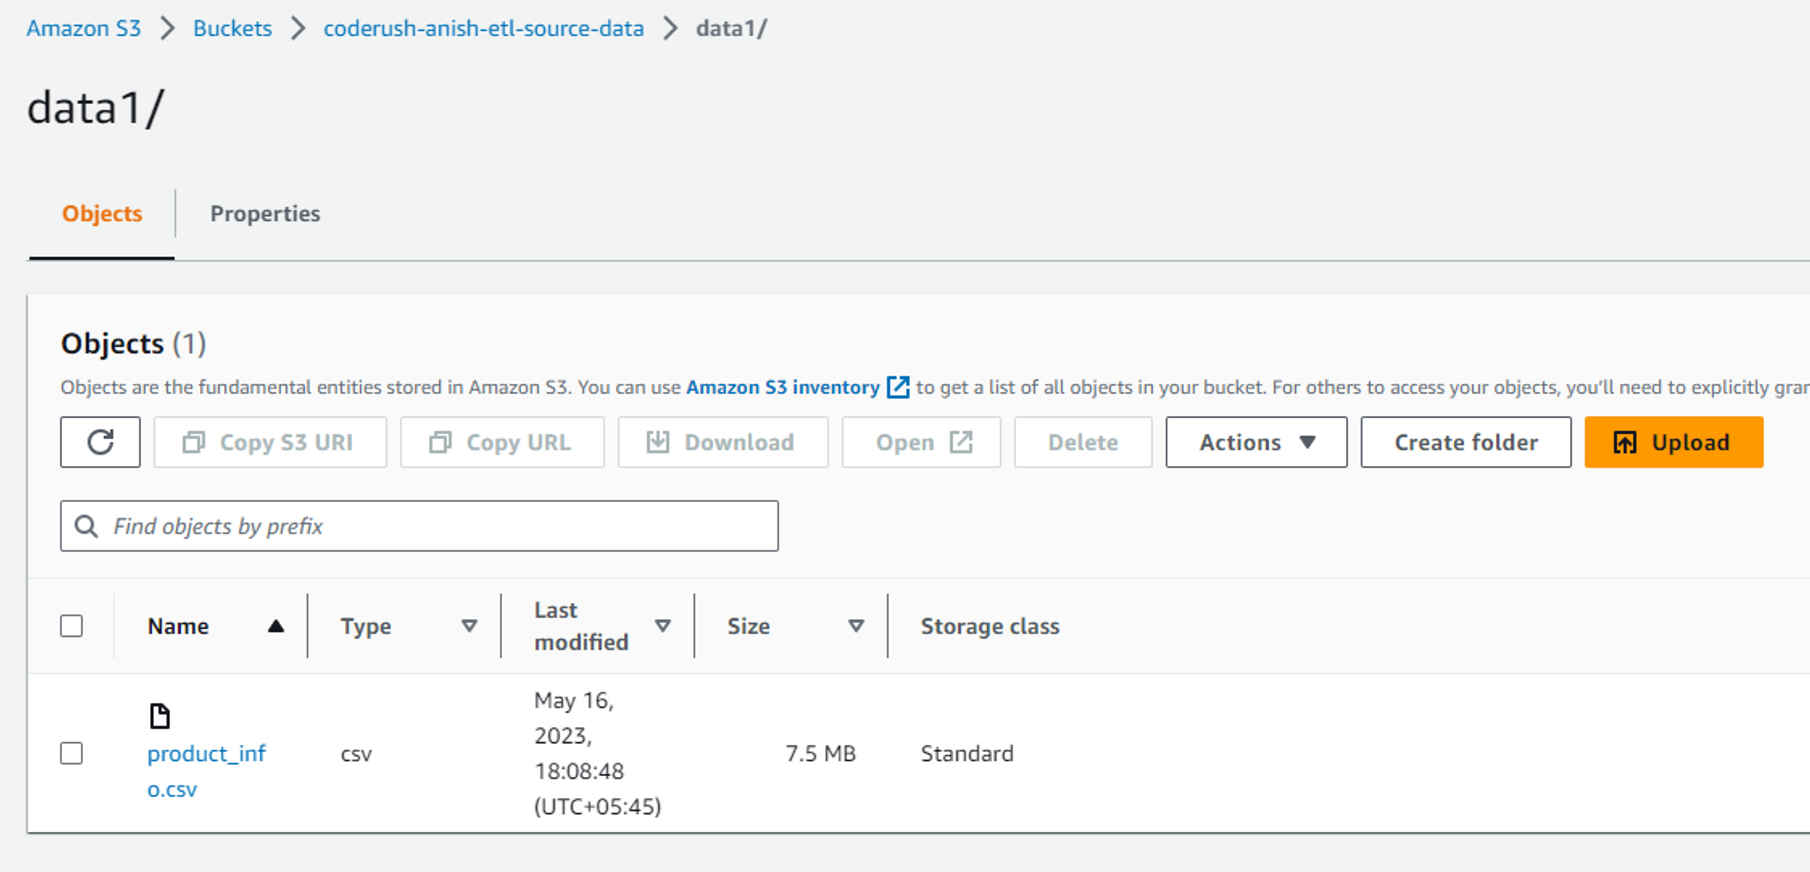
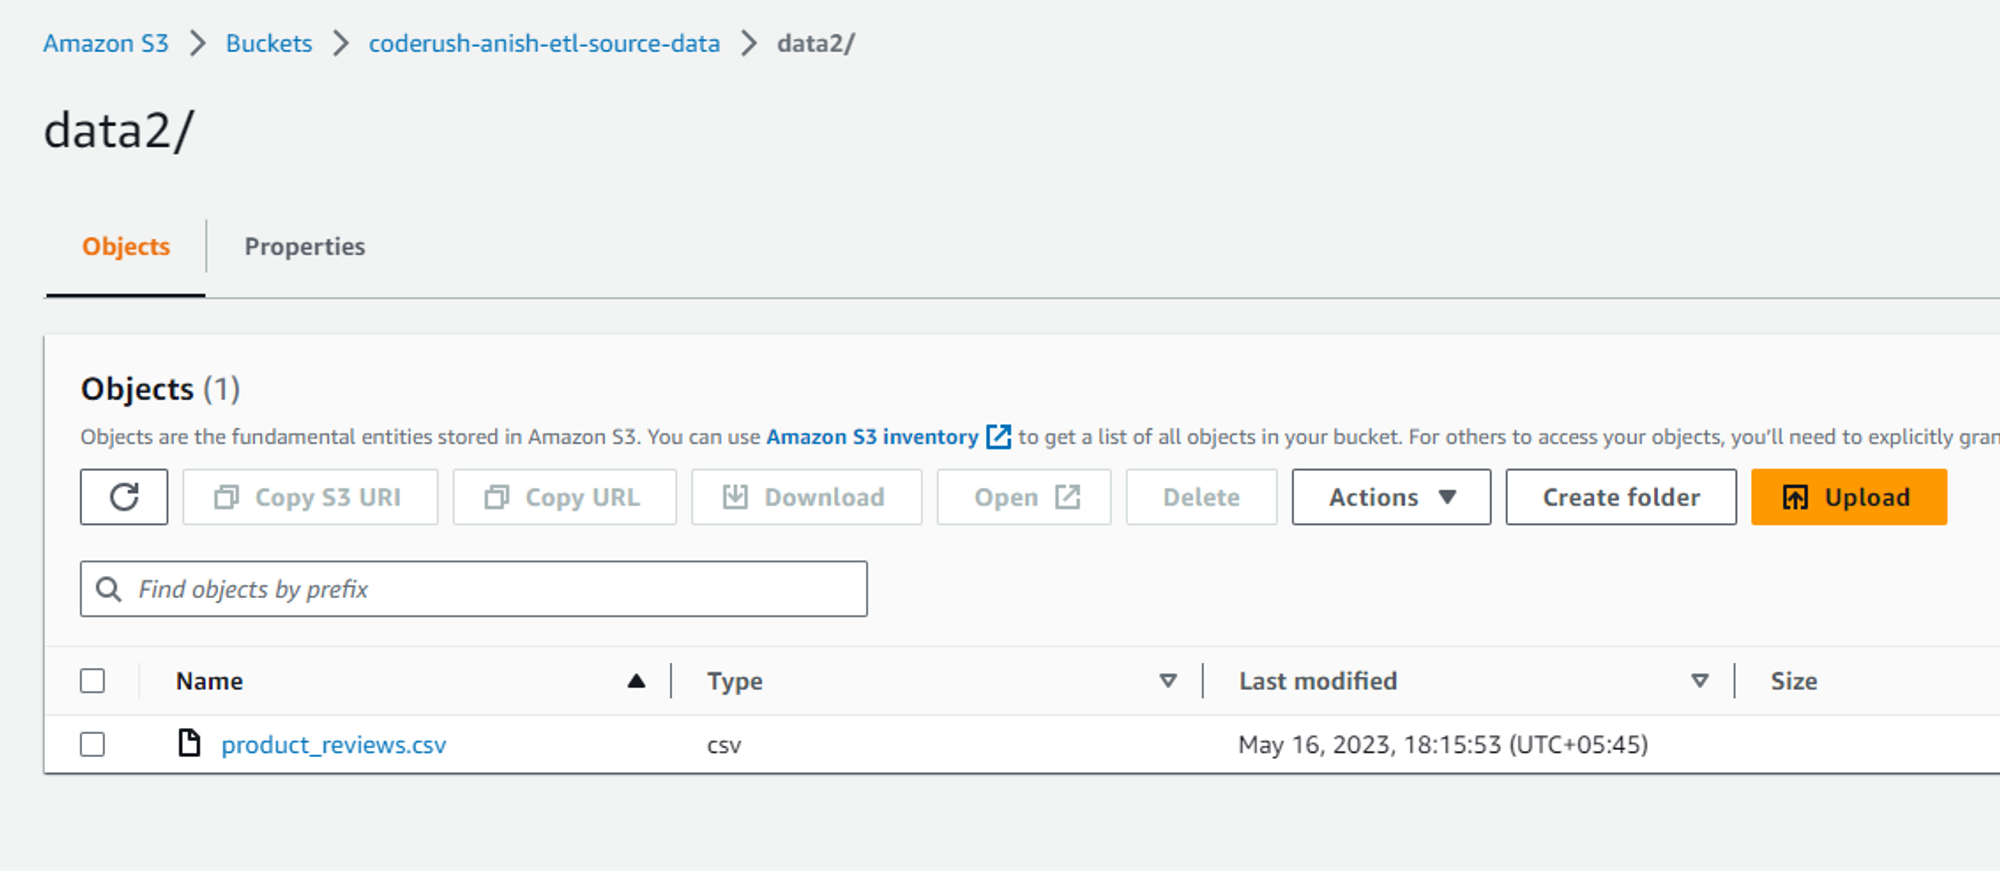
 SOURCE_DATA_BUCKET="coderush-anish-etl-source-data"

 # function to upload files to s3 bucket
 def upload_files_to_s3_bucket(files_to_upload: list):
     # Uploading the dataset files from local directory to s3 bucket
     try:
         print("Started uploading the files . . .")
         # print(files_to_upload)
         for file_name in files_to_upload:
             s3.upload_file(f"{DATASET_FOLDER}/{file_name}",SOURCE_DATA_BUCKET,file_name)
         print('Successfully uploaded all files')
     except Exception as e:
         print(f"Failed to upload datasets to s3 bucket.\nFollowing error occured:\n{e}")

 try:
     # get list of all available buckets
     response = s3.list_buckets()
     # print(response)
     #? Response looks like this
     # {'ResponseMetadata': {'RequestId': 'YMYR3MA9HN636GKE', 'HostId': 'GdfIlZp7Pd2k1SGdSHeLzPac01j/HoJRtilc/m3h5HMqjfBvZ9wqbIU3fIAObcJ6Xjc2HNVMJ4s=', 'HTTPStatusCode': 200, 'HTTPHeaders': {'x-amz-id-2': 'GdfIlZp7Pd2k1SGdSHeLzPac01j/HoJRtilc/m3h5HMqjfBvZ9wqbIU3fIAObcJ6Xjc2HNVMJ4s=', 'x-amz-request-id': 'YMYR3MA9HN636GKE', 'date': 'Sun, 14 May 2023 08:09:14 GMT', 'content-type': 'application/xml', 'transfer-encoding': 'chunked', 'server': 'AmazonS3'}, 'RetryAttempts': 0}, 'Buckets': [{'Name': 'anish-shilpakar-ccp-2022-demo', 'CreationDate': datetime.datetime(2023, 1, 16, 9, 40, 15, tzinfo=tzutc())}, {'Name': 'anish-shilpakar-replication-demo', 'CreationDate': datetime.datetime(2023, 1, 16, 9, 28, 12, tzinfo=tzutc())}, {'Name': 'anish-shilpakar-server-access-logs', 'CreationDate': datetime.datetime(2023, 1, 16, 9, 12, 36, tzinfo=tzutc())}, {'Name': 'coderush-anish-etl-source-data', 'CreationDate': datetime.datetime(2023, 5, 14, 7, 39, 17, tzinfo=tzutc())}, {'Name': 'elasticbeanstalk-ap-south-1-977481651193', 'CreationDate': datetime.datetime(2023, 1, 17, 12, 31, 59, tzinfo=tzutc())}], 'Owner': {'ID': 'ba72a4b013b258edfa3487309159137f7a6ebb75e63e86982391186c8ca1bf29'}}
     buckets_list = []
     for res in response['Buckets']:
         buckets_list.append(res['Name'])
     # print(buckets_list)
 except Exception as e:
     print(f"Error fetching the s3 buckets. Following error encountered:\n{e}")

 # Create S3 bucket if not exists
 if SOURCE_DATA_BUCKET not in buckets_list:
     print(f"Creating {SOURCE_DATA_BUCKET} . . .")
     try:
         response = s3.create_bucket(
             Bucket=SOURCE_DATA_BUCKET,
             CreateBucketConfiguration={
                     'LocationConstraint': 'ap-south-1'
                     }
         )
         print(f"{SOURCE_DATA_BUCKET} created successfully !")
     except Exception as e:
         print(f"Failed to create {SOURCE_DATA_BUCKET}. Following error encountered:\n{e}")
 else:
     print(f"{SOURCE_DATA_BUCKET} already exists!")

 # Uploading the dataset files from local directory to s3 bucket
 upload_files_to_s3_bucket(["product_info.parquet","product_reviews.parquet"])
After this, if we check the S3 bucket in our AWS management console, we can see the following output.
Transform Step
The next step in this ETL pipeline is the transform step, where the raw data in the S3 bucket was taken and then transformed using pandas to transform it to a standard and usable format.
The following code was used to transform the data into a usable format. The transformed data were also uploaded to an S3 bucket.
def transform_data(df1,df2):
    print("Starting Transform Step . . .")
    # merge two datasets based on product_id
    df_merged = pd.merge(df1,df2,how="inner",on="product_id")
    # Rename Columns
    rename_dict = {
    "loves_count": "favorites_count",
    "rating_x": "avg_product_rating",
    "reviews": "product_reviews_count",
    "primary_category": "product_category",
    "child_count": "variations_count",
    "rating_y": "review_rating",
    "submission_time": "full_date",
    "skin_tone": "reviewer_skin_tone",
    "skin_type": "reviewer_skin_type",
    "eye_color": "reviewer_eye_color",
    "hair_color": "reviewer_hair_color",
    "price_usd": "product_price",
    "author_id": "reviewer_id"
    }
    df_merged = df_merged.rename(columns=rename_dict)
    # cleaning nan values
    # 1. drop rows with nan values in review_text as it is most essential for product_reviews
    df_merged = df_merged.dropna(subset=["review_text"])
    #2. review_title is optional, so for rows with nan in review_title but certain values in review_text, fill the nan values with a default placeholder value
    df_merged["review_title"] = df_merged["review_title"].fillna("Review Provided")
    # 3. For categorical columns like reviewer_skin_tone, reviewer_skin_type, reviewer_hair_color, reviewer_eye_color replace the nan values with mode
    df_merged["reviewer_skin_tone"] = df_merged["reviewer_skin_tone"].fillna(df_merged["reviewer_skin_tone"].mode()[0])
    df_merged["reviewer_eye_color"] = df_merged["reviewer_eye_color"].fillna(df_merged["reviewer_eye_color"].mode()[0])
    df_merged["reviewer_skin_type"] = df_merged["reviewer_skin_type"].fillna(df_merged["reviewer_skin_type"].mode()[0])
    df_merged["reviewer_hair_color"] = df_merged["reviewer_hair_color"].fillna(df_merged["reviewer_hair_color"].mode()[0])
    # Creating new columns for date
    df_merged["full_date"] = pd.to_datetime(df_merged["full_date"])
    df_merged["year"] = df_merged["full_date"].dt.year
    df_merged["month"] = df_merged["full_date"].dt.month
    df_merged["day"] = df_merged["full_date"].dt.day
    # Converting the values in reviewer_id column to int from object
    # checking for non-numeric reviewer_id
    df_merged["is_numeric"] = df_merged["reviewer_id"].apply(checkNumeric)
    # removing non numeric reviewer ids
    df_merged = df_merged[df_merged["is_numeric"] == True]
    # dropping the is_numeric column
    df_merged.drop(columns=["is_numeric"],inplace=True)
    # converting reviewer_id to int
    df_merged["reviewer_id"] = df_merged["reviewer_id"].apply(lambda x: int(x))
    # Creating multiple dataframes for fact and dimension tables
    # Product Reviews Table: Fact Table
    reviews_df = df_merged[['product_id','brand_id','reviewer_id','full_date','review_title','review_text','review_rating']]
    reviews_df = reviews_df.rename(columns={'full_date': 'date_id'})
    reviews_df = reviews_df.reset_index(drop=True)
    reviews_df.insert(0, 'review_id', reviews_df.index + 1)
    # Product table: Dimension table
    product_df = df_merged[['product_id', 'product_name', 'avg_product_rating', 'product_price', 'product_reviews_count', 'favorites_count', 'variations_count', 'product_category']]
    # To keep only unique product descriptions in product_df
    product_df = product_df.drop_duplicates("product_id").reset_index(drop=True)
    # Brand table: dimension table
    brand_df = df_merged[['brand_id', 'brand_name']]
    # To keep only the unique brand details in brands dataframe
    brand_df = brand_df.drop_duplicates("brand_id").reset_index(drop=True)
    # Reviewer table: dimension table
    reviewer_df = df_merged[['reviewer_id', 'reviewer_skin_tone', 'reviewer_skin_type', 'reviewer_eye_color', 'reviewer_hair_color']]
    # To keep only unique reviewer details
    reviewer_df = reviewer_df.drop_duplicates("reviewer_id").reset_index(drop=True)
    # Date table: dimension table
    date_df = df_merged[['full_date', 'year', 'month', 'day']]
    date_df = date_df.rename(columns={"full_date": "date_id"})
    date_df = date_df.drop_duplicates("date_id").reset_index(drop=True)
    print("Transform Step Completed")
    # Return the dataframes for fact and dimension tables
    result = {
        "reviews": reviews_df,
        "product": product_df,
        "brand": brand_df,
        "reviewer": reviewer_df,
        "date": date_df
    }

    return result
Load Step
The final step in the ETL pipeline is to load the transformed data to a data warehouse. For the data warehouse, I have provisioned AWS Redshift service. To allow Redshift to access the files in the S3 bucket, we first need to create an IAM role which can be done using the following code.
 # Create the IAM role
 try:
     print('1.1 Creating a new IAM Role')
     dwhRole = iam.create_role(
     RoleName = DWH_IAM_ROLE_NAME,
     Description = 'Allows Redshift cluster to call AWS service on your behalf.',
     AssumeRolePolicyDocument = json.dumps(
         {'Statement': [{'Action': 'sts:AssumeRole',
                        'Effect': 'Allow',
                        'Principal': {'Service': 'redshift.amazonaws.com'}}],
          'Version': '2012-10-17'})
     )
     print(f'Role {DWH_IAM_ROLE_NAME} created successfully')
 except Exception as e:
     print(f"Failure in creating new role {DWH_IAM_ROLE_NAME}.\nFollowing error occured:\n{e}")
After creating the new role, we assign a policy to this role to enable it to read files from the S3 bucket.
 # Attach Policy
 print('1.2 Attaching Policy')
 iam.attach_role_policy(RoleName=DWH_IAM_ROLE_NAME,
                           PolicyArn="arn:aws:iam::aws:policy/AmazonS3ReadOnlyAccess"
                           )['ResponseMetadata']['HTTPStatusCode']
The next step is to create a new Redshift cluster which can be done using the following code.
 try:
     print("Started creating Redshift cluster . . .")
     response = redshift.create_cluster(
         # Hardware
         ClusterType=DWH_CLUSTER_TYPE,
         NodeType=DWH_NODE_TYPE,
         NumberOfNodes=int(DWH_NUM_NODES),
         # Identifiers & credentials
         DBName=DWH_DB,
         ClusterIdentifier=DWH_CLUSTER_IDENTIFIER,
         MasterUsername=DWH_DB_USER,
         MasterUserPassword=DWH_DB_PASSWORD,
         # Role (to allow s3 access)
         IamRoles=[roleArn]
     )
     print(f"Successfully created Redshift cluster: {DWH_DB}")
 except Exception as e:
     print(f"Failure when creating Redshift cluster {DWH_DB}\nFollowing error occured:\n{e}")
Before loading the data to the Redshift data warehouse, we need to ensure that the status of the Redshift cluster is changed to available, which can be done using the following code.
 def checkRedshiftClusterStatus(props):
     keysToShow = ["ClusterIdentifier", "NodeType", "ClusterStatus", "MasterUsername", "DBName", "Endpoint", "NumberOfNodes", 'VpcId']
     x = [(k, v) for k,v in props.items() if k in keysToShow]
     return pd.DataFrame(data=x, columns=["Key", "Value"])

 myClusterProps = redshift.describe_clusters(ClusterIdentifier=DWH_CLUSTER_IDENTIFIER)['Clusters'][0]
 checkRedshiftClusterStatus(myClusterProps)
From here, we need to note the data warehouse endpoint and data warehouse role ARN. In the next step, we need to open an incoming TCP port to access the cluster endpoint. For this, we create a new security group using the ec2 boto3 client and add inbound rules with a TCP port open for all IP addresses. This can be achieved using the following code.
 # ec2 resource using boto3 to configure inbound rules for the security group
 ec2_r = ec2 = boto3.resource('ec2',
                    region_name=AWS_REGION,
                    aws_access_key_id=KEY,
                    aws_secret_access_key=SECRET)

 try:
     response = ec2.create_security_group(
     Description='Security group for redshift cluster',
     GroupName='redshift-sg'
     )
     # print(response)
     # ec2.SecurityGroup(id='sg-0435581179b364351')
     print("Security group created and configured")
     # Adding inbound rule to open an incoming TCP port to access the cluster endpoint
     response.authorize_ingress(
         GroupName=defaultSg.group_name,
         CidrIp='0.0.0.0/0',
         IpProtocol='TCP',
         FromPort=int(DWH_PORT),
         ToPort=int(DWH_PORT)
     )
     print("Inbound port configured successfully!")
 except Exception as e:
     print(f"Failure when creating security group. Following error occured:\n{e}")

 try:
     response = redshift.modify_cluster(
         ClusterIdentifier = DWH_CLUSTER_IDENTIFIER,
         VpcSecurityGroupIds=[
         defaultSg.id
         ]
     )
     print(response)
     print("Successfully modified the security group of redshift cluster")
 except Exception as e:
     print(f"Failed to modify the security group of redshift cluster. Following error occured:\n{e}")
After creating and provisioning the redshift cluster, we need to connect to this redshift cluster using psycopg2. This allows us to connect to the Redshift data warehouse and later create fact and dimension tables in this Redshift data warehouse. The following code is used to connect to the Redshift cluster.
 # Set the connection parameters
 host = DWH_ENDPOINT
 port = DWH_PORT
 dbname = DWH_DB
 user = DWH_DB_USER
 password = DWH_DB_PASSWORD

 # Connect to the Redshift cluster
 conn = psycopg2.connect(
     host=host,
     port=port,
     dbname=dbname,
     user=user,
     password=password
 )
 print("Connected succesfully to Redshift cluster")
 # Open a cursor to perform database operations
 cur = conn.cursor()
Similarly, we can create fact and dimension tables in the Redshift data warehouse by executing SQL queries using the psycopg2 cursor.
```python CREATE_TABLE_QUERIES = [ """ CREATE TABLE IF NOT EXISTS tbl_product( product_id TEXT PRIMARY KEY, product_name TEXT, avg_product_rating FLOAT, product_price FLOAT, product_reviews_count FLOAT, favorites_count INT, variations_count INT, product_category TEXT ) """, """ CREATE TABLE IF NOT EXISTS tbl_brand( brand_id INT PRIMARY KEY, brand_name TEXT UNIQUE ) """, """ CREATE TABLE IF NOT EXISTS tbl_reviewer( reviewer_id BIGINT PRIMARY KEY, reviewer_skin_tone TEXT, reviewer_skin_type TEXT, reviewer_eye_color TEXT, reviewer_hair_color TEXT ) """, """ CREATE TABLE IF NOT EXISTS tbl_date( date_id TIMESTAMP PRIMARY KEY, year INT, month INT, day INT ) """, """ CREATE TABLE IF NOT EXISTS tbl_product_reviews( review_id INT PRIMARY KEY, product_id TEXT REFERENCES tbl_product(product_id), brand_id INT REFERENCES tbl_brand(brand_id), reviewer_id BIGINT REFERENCES tbl_reviewer(reviewer_id), date_id TIMESTAMP REFERENCES tbl_date(date_id), review_title TEXT, review_text VARCHAR(512), review_rating INT ) """ ]
for i,query in enumerate(CREATE_TABLE_QUERIES): print(f"Creating table {i}")
Create a table
cur.execute(query)
print("All tables created successfully")
Commit the transaction
conn.commit()
    Finally, we will load the transformed data from the S3 bucket to these tables in the Redshift cluster. This is achieved by running copy queries using the psycopg2 connection. The code for loading the data in these tables is given below:

    ```python
    # queries to load the data from csv files stored in s3 bucket to the tables in datawarehouse
    LOAD_DATA_QUERIES = [
        """
        COPY tbl_brand FROM 's3://coderush-anish-etl-source-data/brand.csv'
        CREDENTIALS 'aws_iam_role=arn:aws:iam::977481651193:role/dwhRole' FORMAT CSV REGION 'ap-south-1' IGNOREHEADER 1;
        """,
        """
        COPY tbl_date FROM 's3://coderush-anish-etl-source-data/date.csv'
        CREDENTIALS 'aws_iam_role=arn:aws:iam::977481651193:role/dwhRole' FORMAT CSV REGION 'ap-south-1' IGNOREHEADER 1;
        """,
        """
        COPY tbl_product FROM 's3://coderush-anish-etl-source-data/product.csv'
        CREDENTIALS 'aws_iam_role=arn:aws:iam::977481651193:role/dwhRole' FORMAT CSV REGION 'ap-south-1' IGNOREHEADER 1;
        """,
        """
        COPY tbl_reviewer FROM 's3://coderush-anish-etl-source-data/reviewer.csv'
        CREDENTIALS 'aws_iam_role=arn:aws:iam::977481651193:role/dwhRole' FORMAT CSV REGION 'ap-south-1' IGNOREHEADER 1;
        """,
        """
        COPY tbl_product_reviews FROM 's3://coderush-anish-etl-source-data/reviews.csv'
        CREDENTIALS 'aws_iam_role=arn:aws:iam::977481651193:role/dwhRole' FORMAT CSV REGION 'ap-south-1' IGNOREHEADER 1;
        """
    ]

    try:
        for i,query in enumerate(LOAD_DATA_QUERIES):
            print(f"Inserting data to table {i}")
            # Create a table
            cur.execute(query)

        print("Data inserted to all tables successfully")

        # Commit the transaction
        conn.commit()
    except Exception as e:
        print(f"Failed to insert data to tables. Following error was encountered:\n{e}")
        conn.rollback()

    conn.close()
Hence in this way, we can successfully implement an ETL pipeline in AWS and load the data in the Redshift data warehouse. You can check out the entire code in my github repository here ETL_Pipeline_Data_Warehouse/etl_pipeline_data_warehouse_aws.ipynb at master · JuJu2181/ETL_Pipeline_Data_Warehouse (github.com)
Outcomes
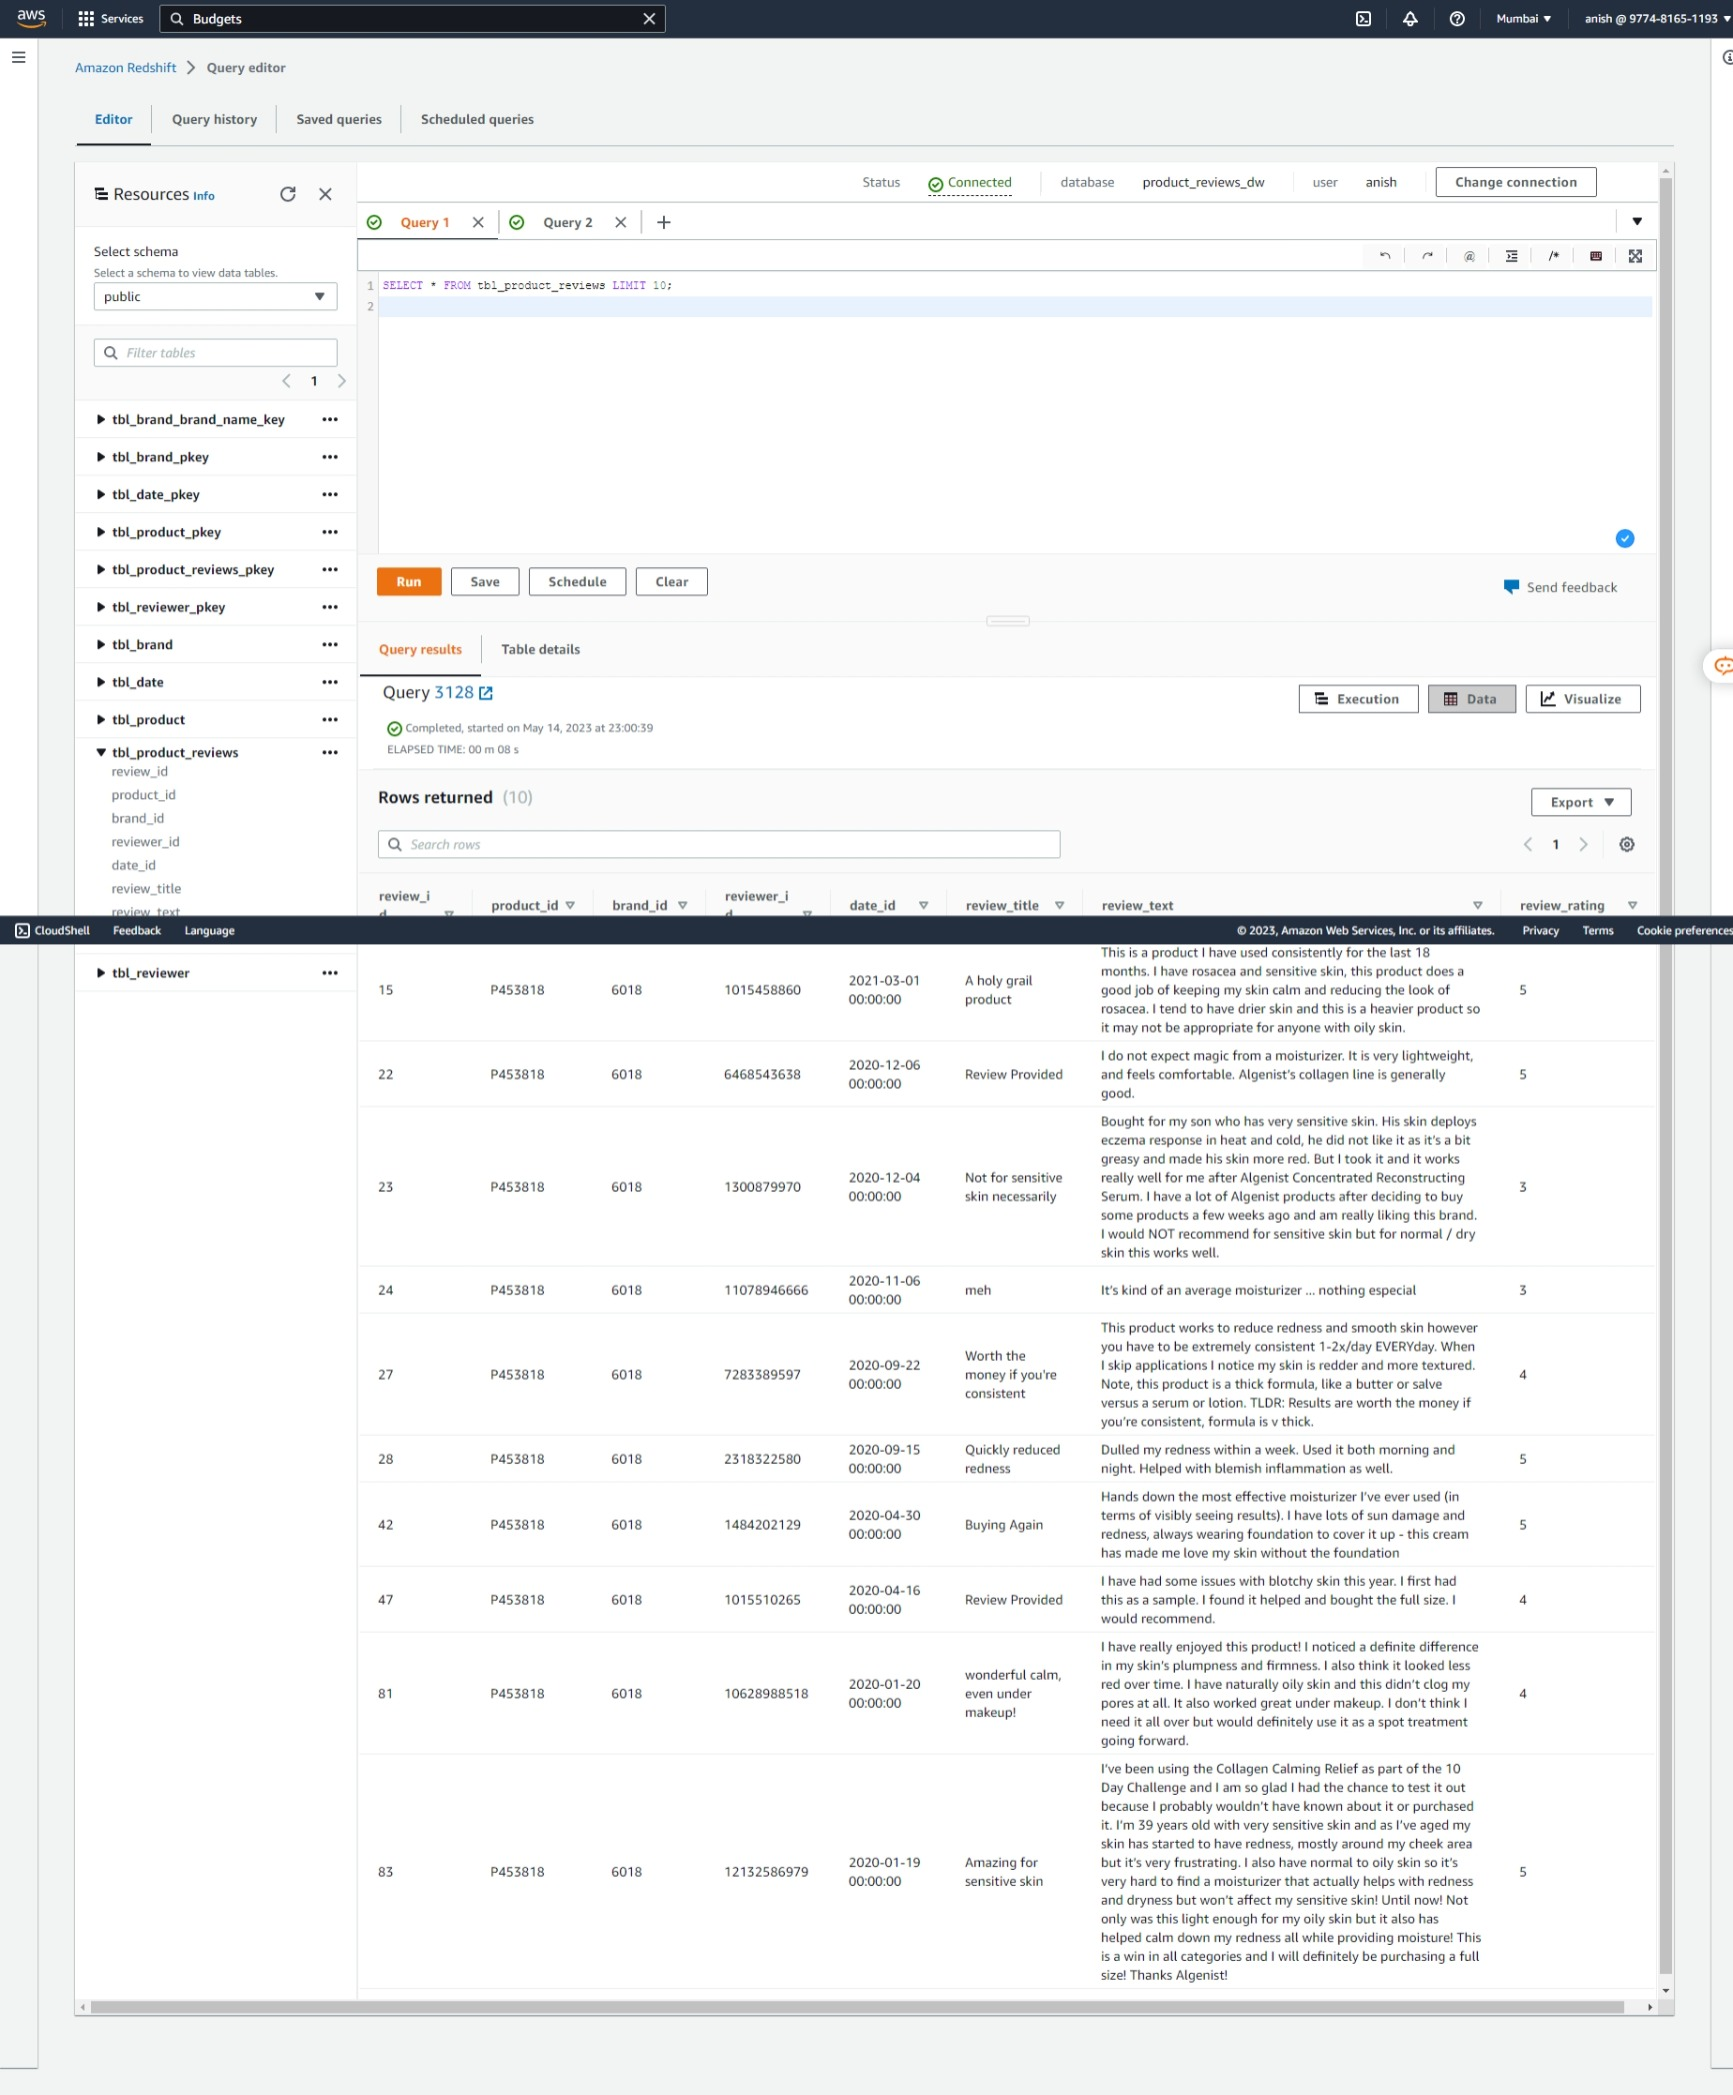
After implementing the ETL pipeline, the following outcomes can be observed in AWS Redshift in the AWS management console.
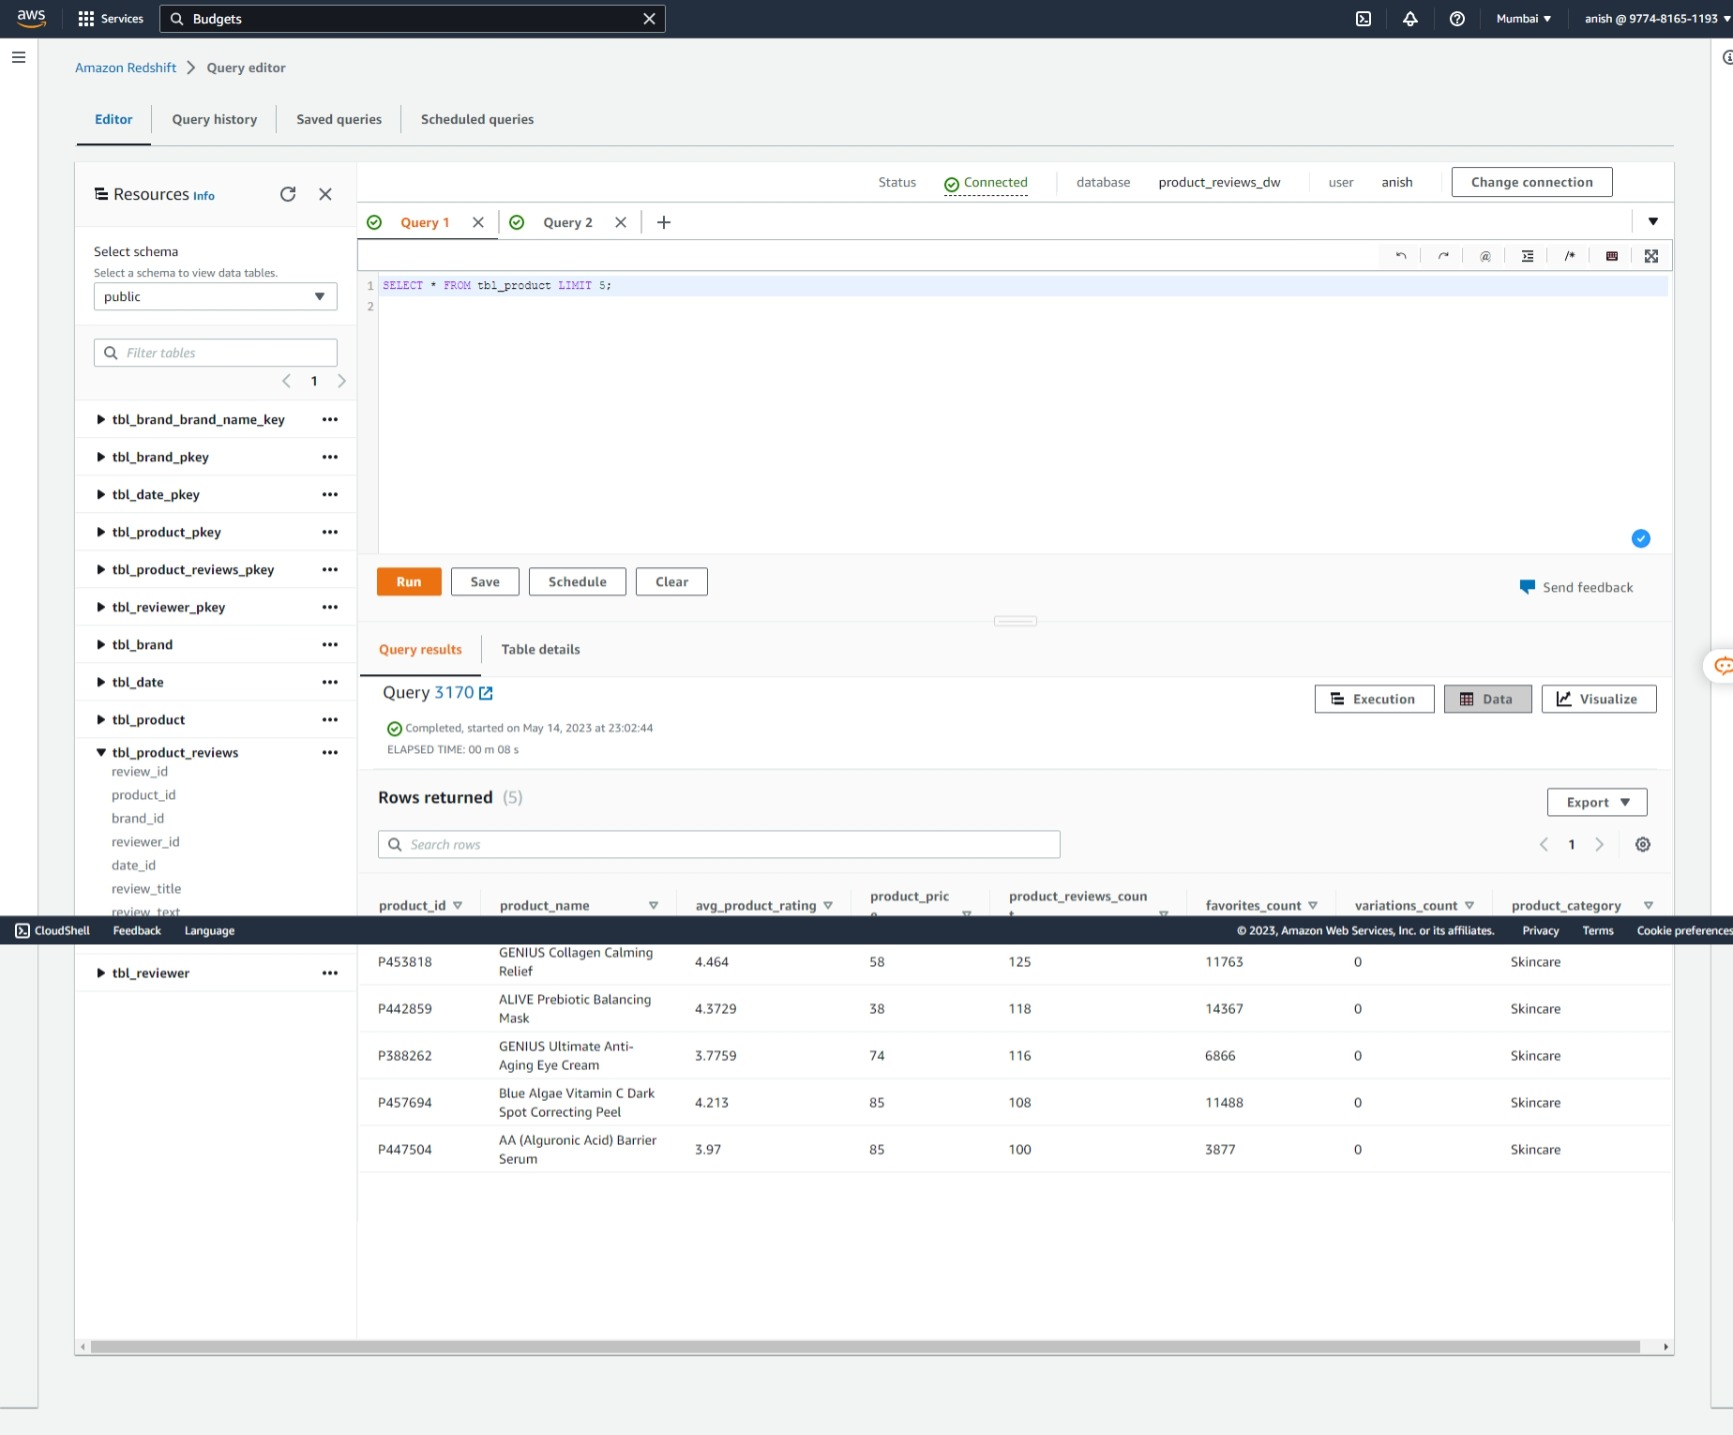
Fact Table: Product Reviews
Dimension Table: Product
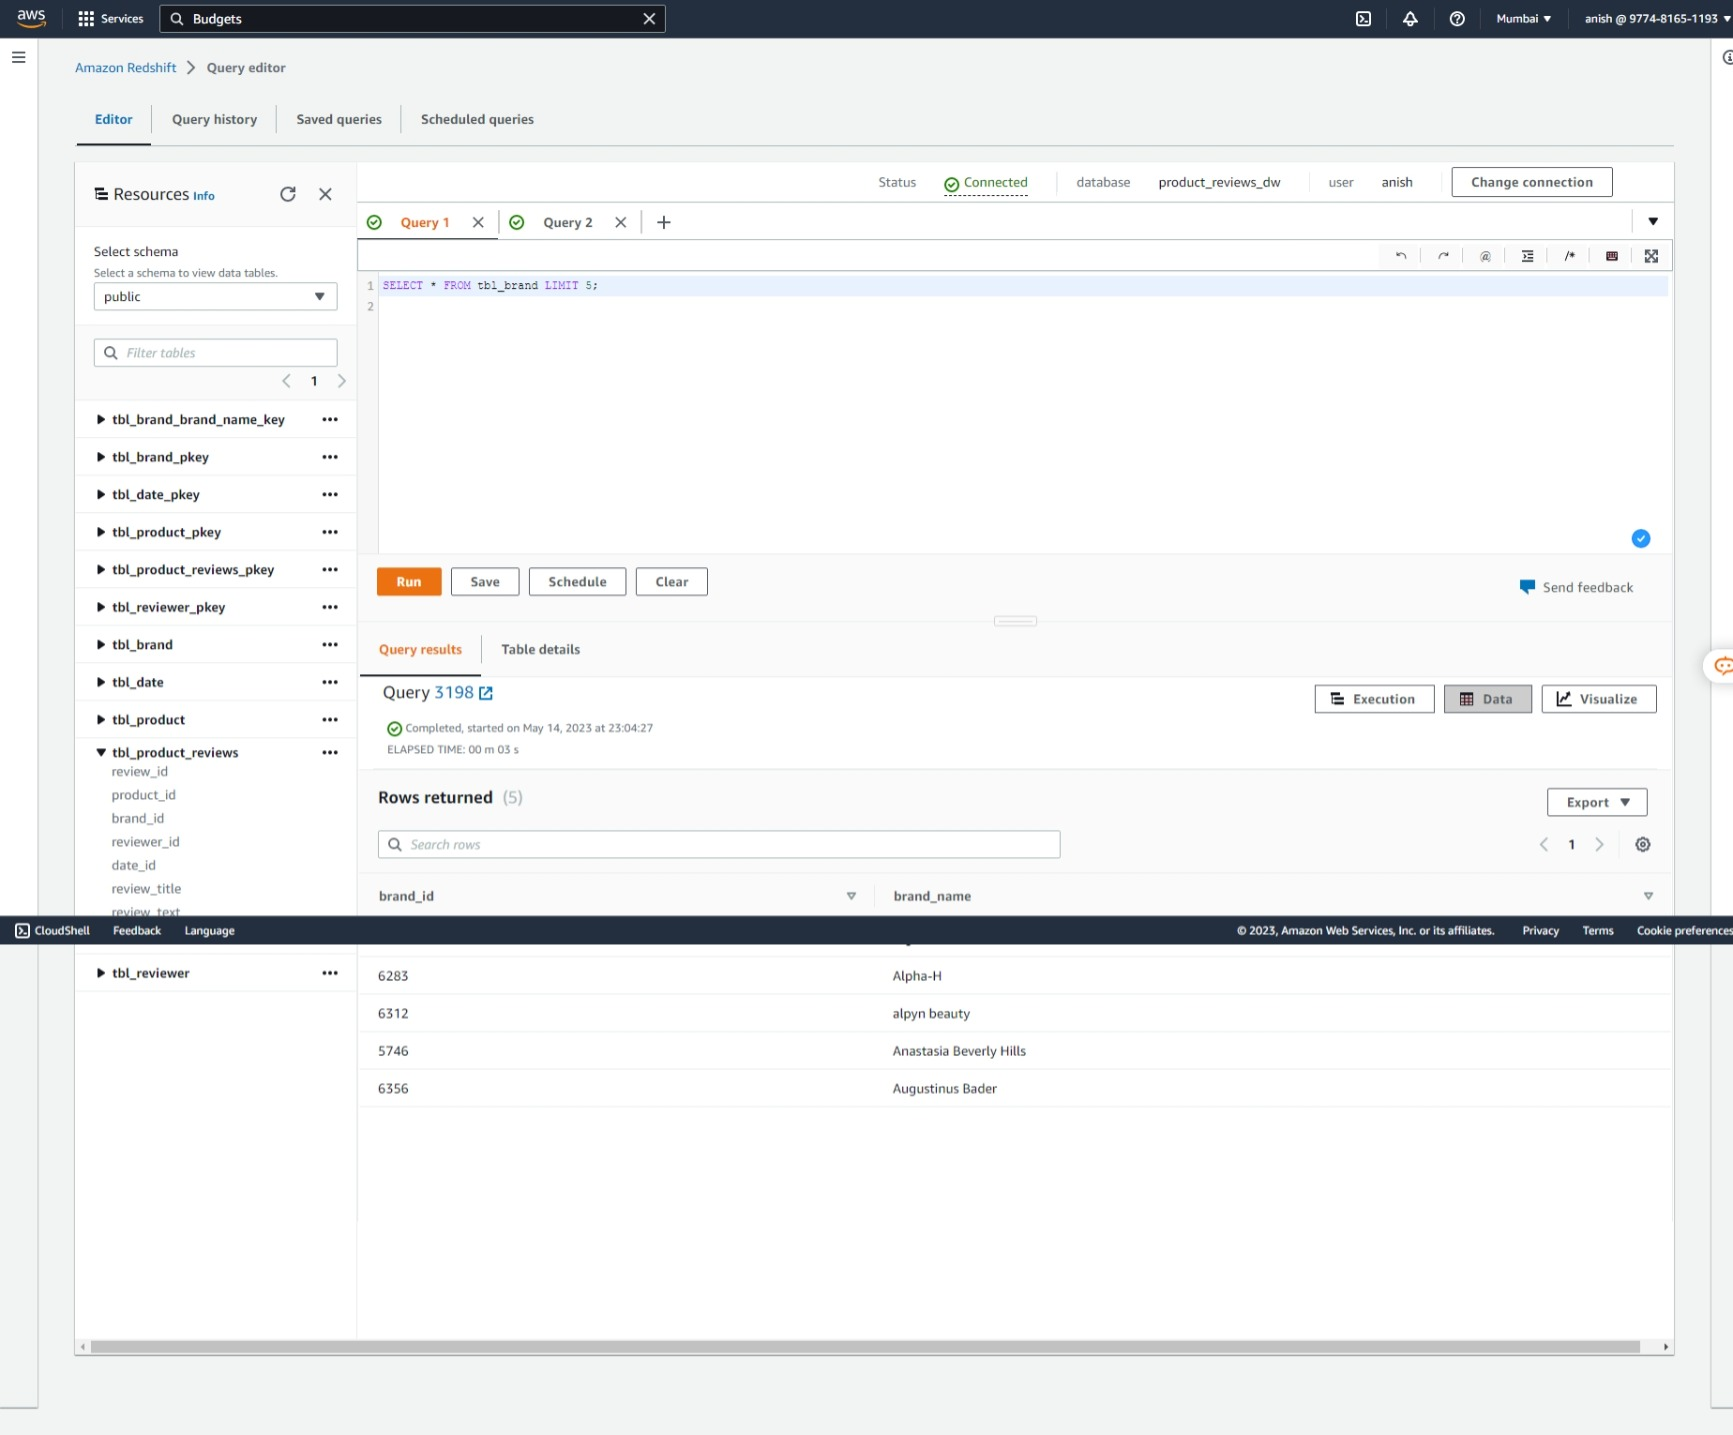
Dimension Table: Brand
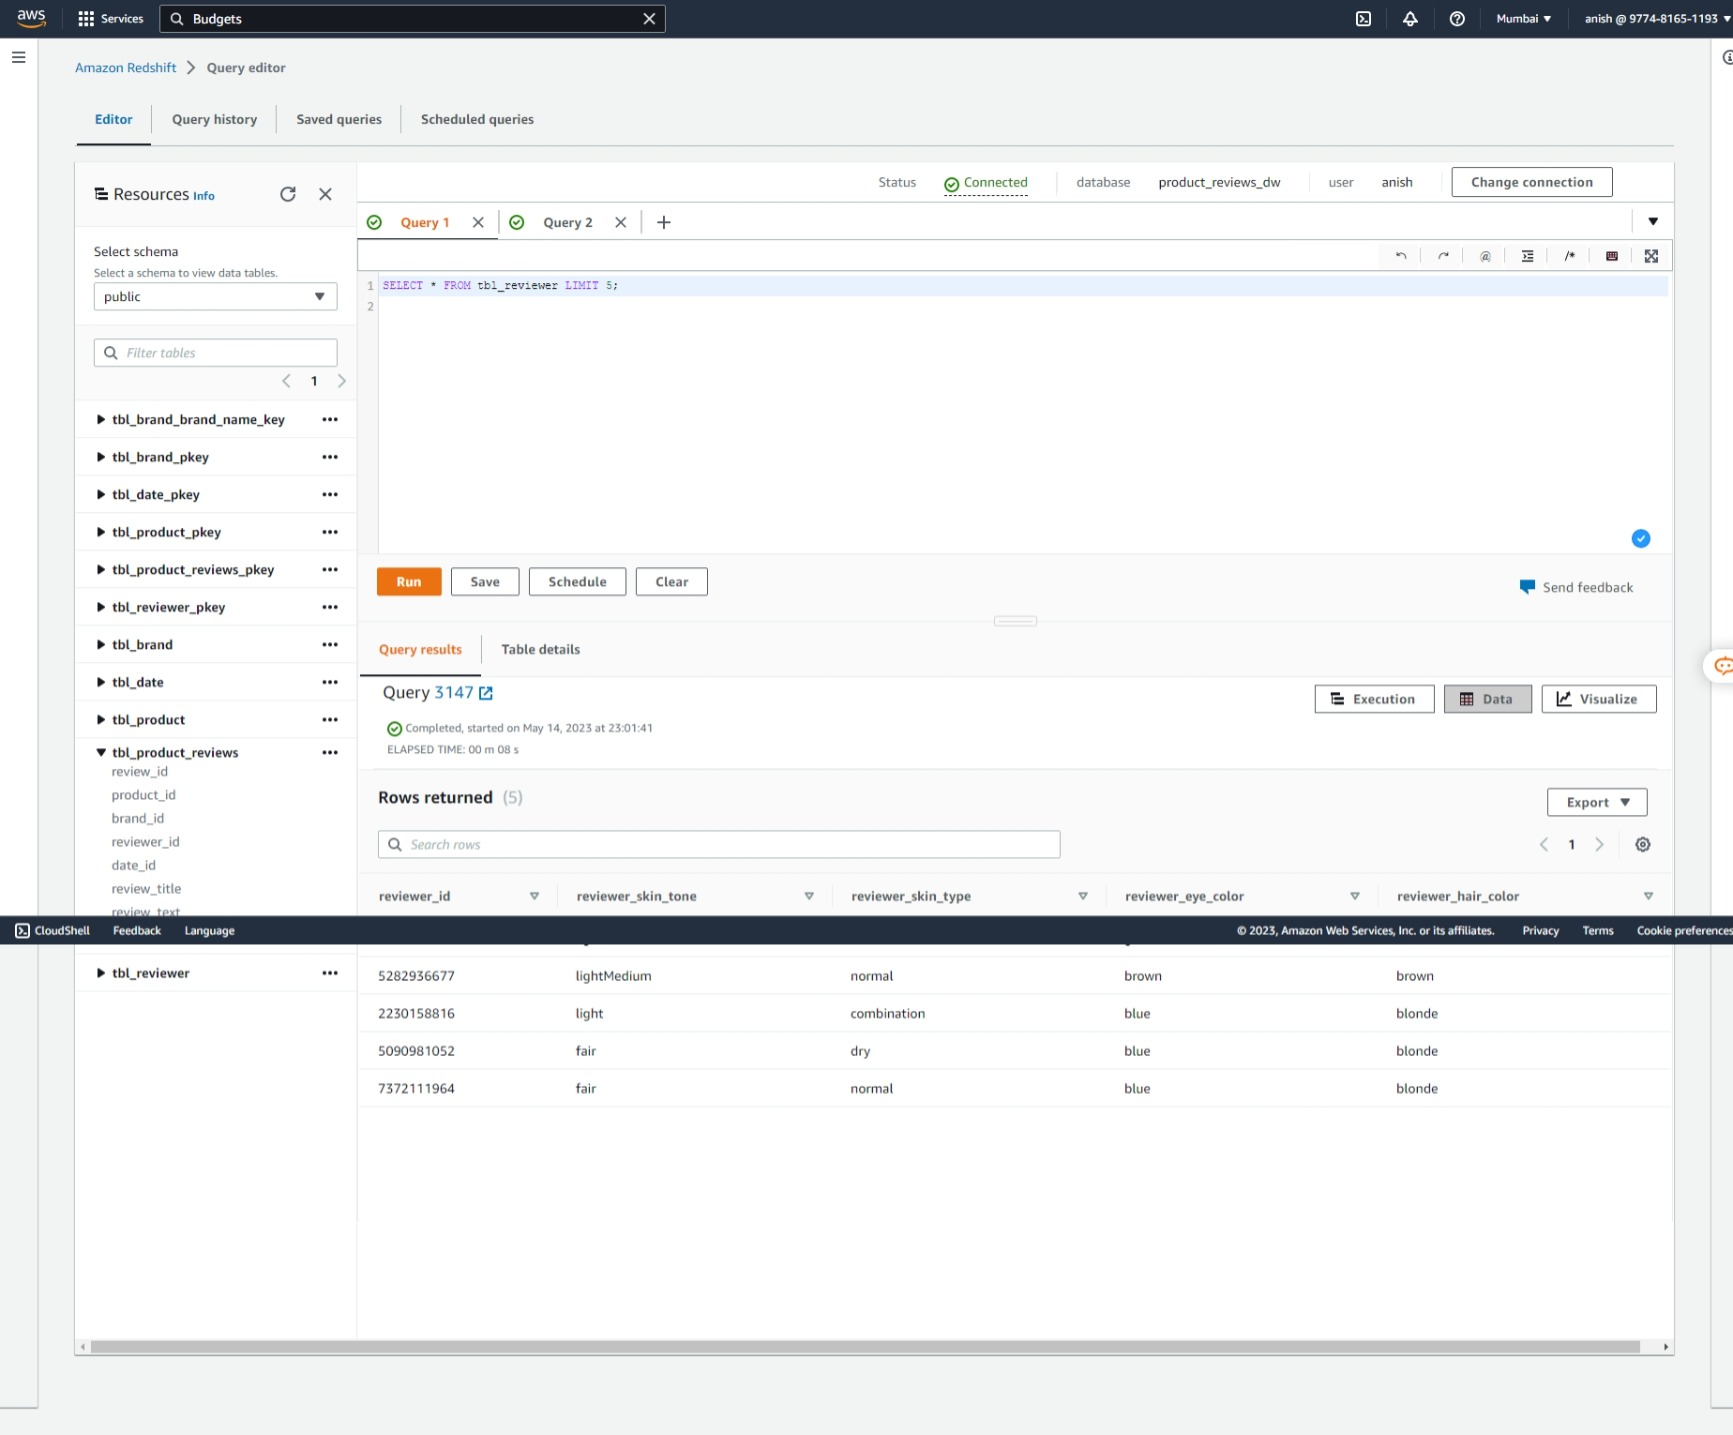
Dimension Table: Reviewer
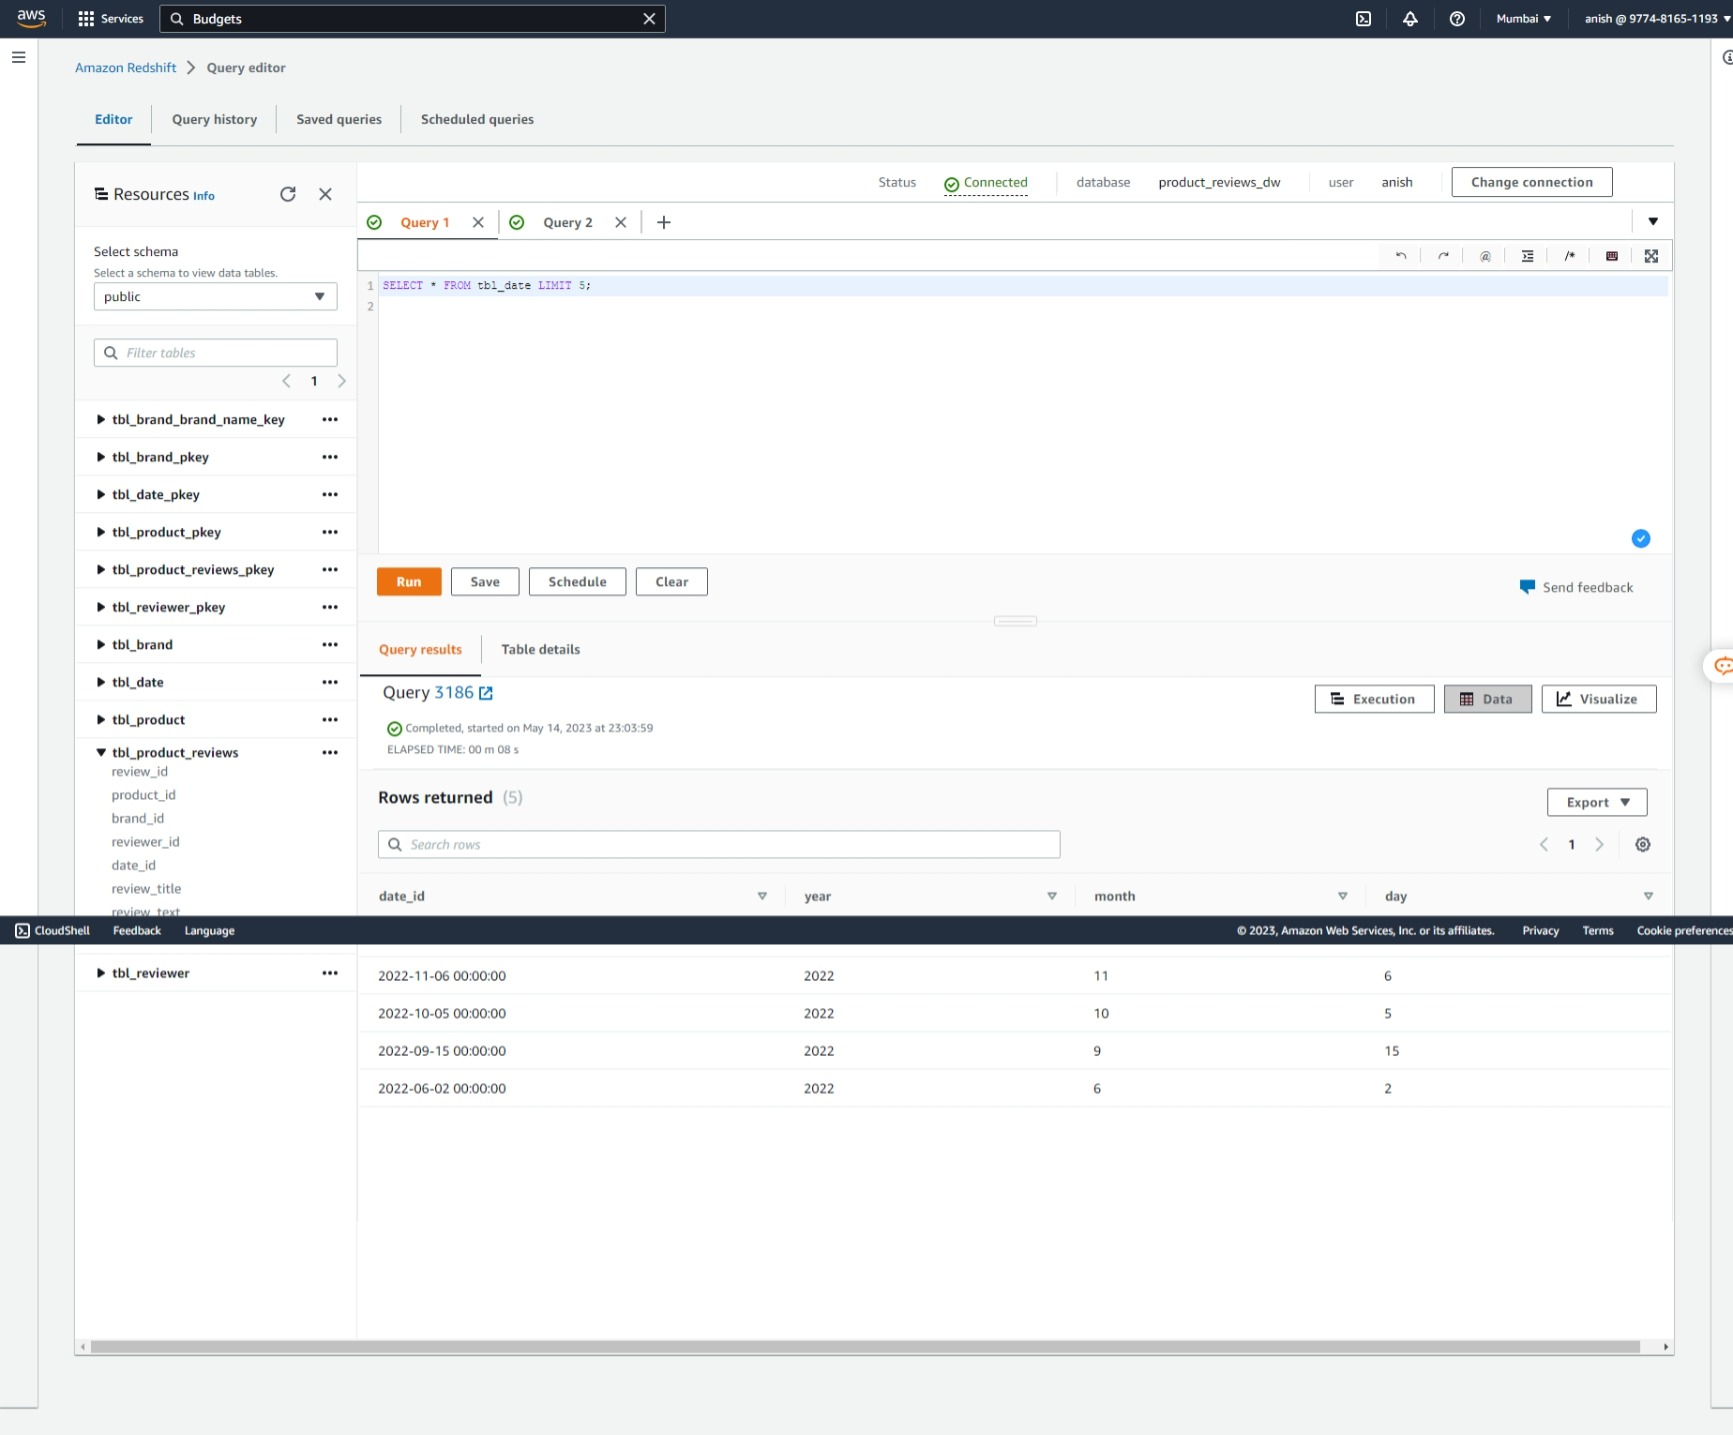
Dimension Table: Date
Conclusion
In conclusion, ETL stands as a critical data management process, involving extraction, transformation, and loading of data into storage systems. The ETL pipeline automates and streamlines this workflow, facilitating efficient data analysis and decision-making. In AWS, services like S3, Glue, and Redshift make ETL easily achievable, empowering businesses with valuable insights for informed decision-making and driving growth.
Epilogue
I am a computer engineering undergraduate and am highly interested in the data and AI field. I recently started learning data engineering and am writing blogs to share my learning. This is my fourth blog in the data engineering series and I hope you enjoyed this read. Next, I will be writing a blog about the implementation of the ETL pipeline using AWS Glue, so stay tuned ✌🏻. This is the way ☄️
GitHub Repository
JuJu2181/ETL_Pipeline_Data_Warehouse: A simple data engineering project where I will be creating ETL data pipelines and using it to store data in a data warehouse (github.com)